

안녕하세요 에이플랫폼 입니다.
오늘은 후술할 Kafka 관련 테스트를 하기 위해 싱글스토 클러스터를 구축하는 방법을 소개해 드리겠습니다.
📌테스트 환경
- Virtual Machine을 사용했습니다.
- OS: Rocky 9.5
- 4 CPU / 8 GB RAM
- 간단하게 설치 후 SingleStore Kafka Pipeline 실습을 위한 목적입니다.
- 1 Host / 1MA + 1LF 구성 입니다.
1. 사전 작업
1.1. SELINUX 끄기
# 아래와 같은 상태라면 OK~
[jwy@kafka ~]$ sestatus
SELinux status:                 disabled

# 만일 아래와 같다면
[jwy@kafka ~]$ sestatus
SELinux status:                 enabled
SELinuxfs mount:                /sys/fs/selinux
SELinux root directory:         /etc/selinux
Loaded policy name:             targeted
Current mode:                   enforcing
Mode from config file:          enforcing
Policy MLS status:              enabled
Policy deny_unknown status:     allowed
Memory protection checking:     actual (secure)
Max kernel policy version:      33

	# 영구 설정
[jwy@kafka ~]$ sudo sed -i "s/^SELINUX=.*/SELINUX=disabled/" /etc/selinux/config
[jwy@kafka ~]$ sestatus
SELinux status:                 enabled
SELinuxfs mount:                /sys/fs/selinux
SELinux root directory:         /etc/selinux
Loaded policy name:             targeted
Current mode:                   enforcing
Mode from config file:          disabled
Policy MLS status:              enabled
Policy deny_unknown status:     allowed
Memory protection checking:     actual (secure)
Max kernel policy version:      33

	# 현재 설정 바꾸기
[jwy@kafka ~]$ sudo setenforce 0

	* 설정 확인 : Permissive 확인
[jwy@kafka ~]$ getenforce
Permissive
1.2. 방화벽 오픈
다음 포트에 대해 OS의 S/W 방화벽(firewalld)을 오픈합니다.
만약, AWS 와 같은 클라우드 인스턴스일 경우, 자체 네트웍(VCN)망의 방화벽 오픈도 필요합니다.
- 3306, 3307 : node 사이의 통신을 위한 포트
# 포트 개방
[jwy@kafka ~]$ sudo firewall-cmd --permanent --zone=public --add-port=3306/tcp --add-port=3307/tcp
success

## 방화벽 재시작
[jwy@kafka ~]$ sudo firewall-cmd --reload
success
2. 싱글스토어 클러스터 구성
2.1. 싱글 스토어 패키지 다운로드
1) 패키지 다운로드
다운로드 사이트 https://docs.singlestore.com/db/v8.9/deploy/linux/yaml-online-rpm/#online-installation-red-hat-distribution 에서 최신 패키지를 다운로드 합니다.
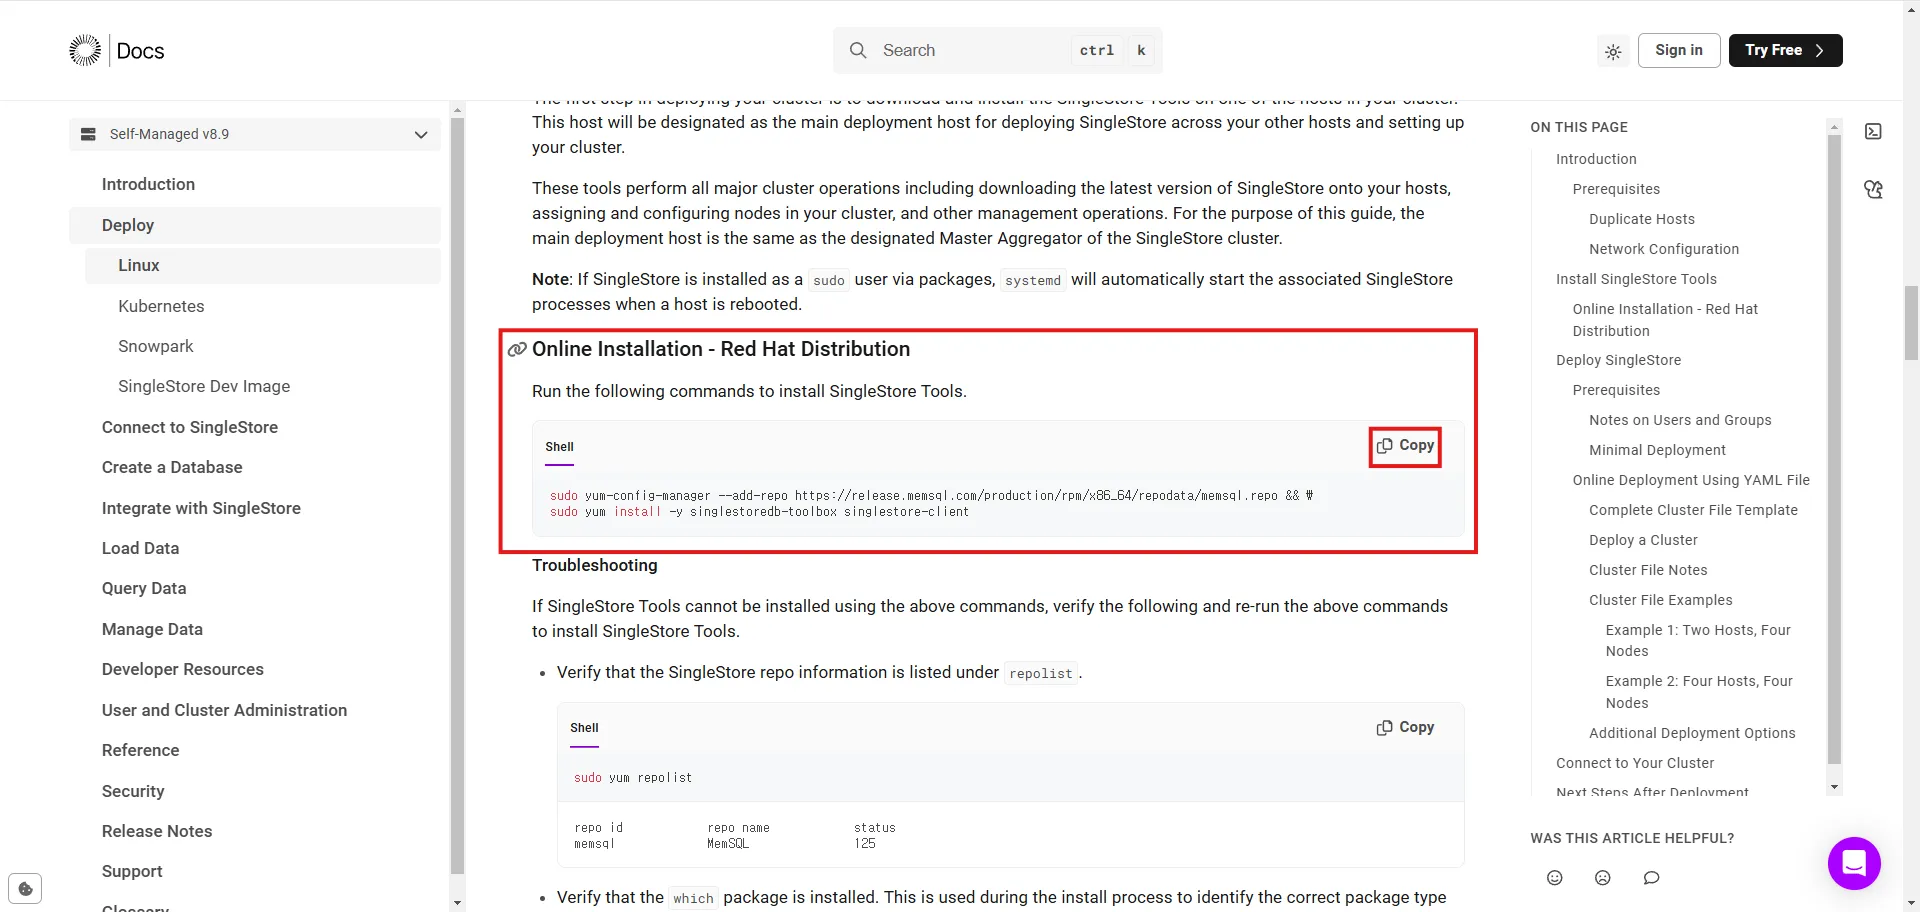
[jwy@kafka ~]$ sudo yum-config-manager --add-repo <https://release.memsql.com/production/rpm/x86_64/repodata/memsql.repo> && \\
sudo yum install -y singlestoredb-toolbox singlestore-client

## sudo: yum-config-manager: command not found 에러 대처
[jwy@kafka ~]$ sudo yum-config-manager --add-repo <https://release.memsql.com/production/rpm/x86_64/repodata/memsql.repo> && \\
sudo yum install -y singlestoredb-toolbox singlestore-client
sudo: yum-config-manager: command not found

# yum-utils를 설치해 주세요
[jwy@kafka ~]$ sudo yum install yum-utils -y

# 다시 설치
[jwy@kafka ~]$ sudo yum-config-manager --add-repo <https://release.memsql.com/production/rpm/x86_64/repodata/memsql.repo> && \\
sudo yum install -y singlestoredb-toolbox singlestore-client
2) yaml 파일 작성 (8.9 버전 설치)
# memsql_server_version 상세 버전 지정 안하시면 자동으로 최신버전으로 설치 가능합니다.
cat >> setup.yaml << _EOF_
license: {license key: 발급은 [SingleStore 홈페이지 Free License 발급 가능](<https://www.notion.so/SingleStoreDB-2c08835f3dac4b7fad79a2f21eb72ea4?pvs=21>)}
high_availability: false
memsql_server_version: 8.9
package_type: rpm
root_password: {원하는 비밀번호}
allow_duplicate_host_fingerprints: true
optimize: true

hosts:
- hostname: {IP address}
  localhost: true
  nodes:
  - register: false
    role: Master
    config:
      port: 3306
  - register: false
    role: Leaf
    config:
      port: 3307
_EOF_
2.2 sdb-deploy로 클러스터 구축
[jwy@kafka ~]$ sdb-deploy setup-cluster --cluster-file setup.yaml -y
>>>
# 아래와 같은 결과가 나오면 설치 성공
The Final Cluster State
Hosts
+---------------+------------+-------------+---------------+
|     Host      | Local Host | SSH address | Identity File |
+---------------+------------+-------------+---------------+
| {ip address}  | Yes        |             |               |
+---------------+------------+-------------+---------------+
Nodes
+------------+--------+---------------+------+---------------+--------------+---------+----------------+--------------------+--------------+
| MemSQL ID  |  Role  |     Host      | Port | Process State | Connectable? | Version | Recovery State | Availability Group | Bind Address |
+------------+--------+---------------+------+---------------+--------------+---------+----------------+--------------------+--------------+
| AD47A606A2 | Master | {ip address}  | 3306 | Running       | True         | 8.9.7   | Online         |                    | 0.0.0.0      |
| 30F4263BDC | Leaf   | {ip address}  | 3307 | Running       | True         | 8.9.7   | Online         | 1                  | 0.0.0.0      |
+------------+--------+---------------+------+---------------+--------------+---------+----------------+--------------------+--------------+
3. 싱글스토어 접속
[jwy@kafka ~]$ singlestore -p
Enter password:{yaml 파일 에서 설정하셨던 패스워드 입력}
>>>
# 아래와 같은 결과가 나오면 접속 성공
Welcome to the MySQL monitor.  Commands end with ; or \\g.
Your MySQL connection id is 15
Server version: 5.7.32 SingleStoreDB source distribution (compatible; MySQL Enterprise & MySQL Commercial)

Copyright (c) 2000, 2022, Oracle and/or its affiliates.

Oracle is a registered trademark of Oracle Corporation and/or its
affiliates. Other names may be trademarks of their respective
owners.

Type 'help;' or '\\h' for help. Type '\\c' to clear the current input statement.

singlestore>
4. 완성

여기 까지 오셨다면 싱글스토어를 테스트 해보기 위한 간단한 클러스터 구축이 완료 되었습니다.


'SingleStoreDB > 엔지니어링' 카테고리의 다른 글
| DashApp 따라하기 with SingleStore (0) | 2025.02.27 |
|---|---|
| Semantic Search 따라하기 with SingleStore (0) | 2025.02.24 |
| 카프카(kafka) 싱글 노드 클러스터 구축 (0) | 2025.02.03 |
| SingleStore : HTAP - Local Storage Database Demo (0) | 2022.10.18 |
| SingleStore : HTAP - Unlimited Storage Database Demo (0) | 2022.10.18 |


